This document is for a version of CakePHP that is no longer supported. Please upgrade to a newer release!
CakePHP at a Glance
CakePHP is designed to make common web-development tasks simple, and easy. By providing an all-in-one toolbox to get you started the various parts of CakePHP work well together or separately.
The goal of this overview is to introduce the general concepts in CakePHP, and give you a quick overview of how those concepts are implemented in CakePHP. If you are itching to get started on a project, you can start with the tutorial, or dive into the docs.
Conventions Over Configuration
CakePHP provides a basic organizational structure that covers class names, filenames, database table names, and other conventions. While the conventions take some time to learn, by following the conventions CakePHP provides you can avoid needless configuration and make a uniform application structure that makes working with various projects simple. The conventions chapter covers the various conventions that CakePHP uses.
The Model Layer
The Model layer represents the part of your application that implements the business logic. It is responsible for retrieving data and converting it into the primary meaningful concepts in your application. This includes processing, validating, associating or other tasks related to handling data.
In the case of a social network, the Model layer would take care of
tasks such as saving the user data, saving friends’ associations, storing
and retrieving user photos, finding suggestions for new friends, etc.
The model objects can be thought of as “Friend”, “User”, “Comment”, or
“Photo”. If we wanted to load some data from our users table we could do:
use Cake\ORM\TableRegistry;

// Prior to 3.6 use TableRegistry::get('Users')
$users = TableRegistry::getTableLocator()->get('Users');
$query = $users->find();
foreach ($query as $row) {
    echo $row->username;
}
You may notice that we didn’t have to write any code before we could start working with our data. By using conventions, CakePHP will use standard classes for table and entity classes that have not yet been defined.
If we wanted to make a new user and save it (with validation) we would do something like:
use Cake\ORM\TableRegistry;

// Prior to 3.6 use TableRegistry::get('Users')
$users = TableRegistry::getTableLocator()->get('Users');
$user = $users->newEntity(['email' => '[email protected]']);
$users->save($user);
The View Layer
The View layer renders a presentation of modeled data. Being separate from the Model objects, it is responsible for using the information it has available to produce any presentational interface your application might need.
For example, the view could use model data to render an HTML view template containing it, or a XML formatted result for others to consume:
// In a view template file, we'll render an 'element' for each user.
<?php foreach ($users as $user): ?>
    <li class="user">
        <?= $this->element('user_info', ['user' => $user]) ?>
    </li>
<?php endforeach; ?>
The View layer provides a number of extension points like View Templates, Elements and View Cells to let you re-use your presentation logic.
The View layer is not only limited to HTML or text representation of the data. It can be used to deliver common data formats like JSON, XML, and through a pluggable architecture any other format you may need, such as CSV.
The Controller Layer
The Controller layer handles requests from users. It is responsible for rendering a response with the aid of both the Model and the View layers.
A controller can be seen as a manager that ensures that all resources needed for completing a task are delegated to the correct workers. It waits for petitions from clients, checks their validity according to authentication or authorization rules, delegates data fetching or processing to the model, selects the type of presentational data that the clients are accepting, and finally delegates the rendering process to the View layer. An example of a user registration controller would be:
public function add()
{
    $user = $this->Users->newEntity();
    if ($this->request->is('post')) {
        $user = $this->Users->patchEntity($user, $this->request->getData());
        if ($this->Users->save($user, ['validate' => 'registration'])) {
            $this->Flash->success(__('You are now registered.'));
        } else {
            $this->Flash->error(__('There were some problems.'));
        }
    }
    $this->set('user', $user);
}
You may notice that we never explicitly rendered a view. CakePHP’s conventions
will take care of selecting the right view and rendering it with the view data
we prepared with set().
CakePHP Request Cycle
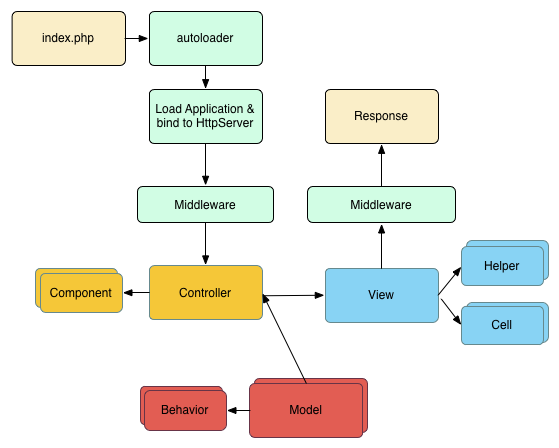
Now that you are familiar with the different layers in CakePHP, lets review how a request cycle works in CakePHP:

The typical CakePHP request cycle starts with a user requesting a page or resource in your application. At a high level each request goes through the following steps:
The webserver rewrite rules direct the request to webroot/index.php.
Your Application is loaded and bound to an
HttpServer.Your application’s middleware is initialized.
A request and response is dispatched through the PSR-7 Middleware that your application uses. Typically this includes error trapping and routing.
If no response is returned from the middleware and the request contains routing information, a controller & action are selected.
The controller’s action is called and the controller interacts with the required Models and Components.
The controller delegates response creation to the View to generate the output resulting from the model data.
The view uses Helpers and Cells to generate the response body and headers.
The response is sent back out through the Middleware.
The
HttpServeremits the response to the webserver.
Just the Start
Hopefully this quick overview has piqued your interest. Some other great features in CakePHP are:
A caching framework that integrates with Memcached, Redis and other backends.
Powerful code generation tools so you can start immediately.
Integrated testing framework so you can ensure your code works perfectly.
The next obvious steps are to download CakePHP, read the tutorial and build something awesome.
